Q-tip Snowflakes: a Charming Winter Craft for All Ages
Imagine a winter day indoors with the kids, eager for a new activity that’s both fun and rewarding. I’ve found joy in creating Q-tip snowflakes, a versatile craft that brings the beauty of the winter season into our home.
Crafting these delicate wonders offers a wonderful opportunity for children of various ages to enhance their fine motor skills.
With some cotton swabs, a bit of glue, and a splash of creativity, everyone can produce stunning snowflake designs unique as the real ones falling from the sky.
It’s a special way to engage young minds and also a perfect family bonding activity that transcends age barriers, inviting all to craft beautiful snowflakes together.
Why Choose Q-Tip Snowflakes?
Crafting Q-tip snowflakes is more than just a fun activity; it’s a great way to boost creativity, especially in young minds.
Encourage kids to design their unique snowflake patterns, helping them explore their imaginative potential. Each delicate Q-tip placement is an exercise in creativity, with the added benefit of nurturing their understanding of symmetry and design.
These snowflakes can also serve as splendid hands-on STEM activities. As children manipulate the Q-tips into various lengths and sizes, they’re actively engaging in a basic form of engineering, understanding the relationships between structure and aesthetics.
Moreover, assembling Q-tip snowflakes is an excellent method for improving hand-eye coordination. The precise movements required to glue each Q-tip in place are gentle yet demanding tasks that refine motor skills.
These nuanced motions support the development of coordination and dexterity, valuable skills that extend beyond crafting.
Creating these snowflakes can also be a calming experience, allowing both children and adults to relax and enjoy the serenity of the creative process.
In essence, Q-tip snowflake crafting combines art, science, and play in a harmonious blend that appeals to crafters of all ages.
Customization Options
I love the fact that Q-tip snowflakes offer endless possibilities for customization. You can personalize your snowflakes to reflect your unique style or to complement your winter holiday décor.
Experimenting with different colors for the cardboard provides a quick and effective way to change the overall look of your snowflake. Whether you prefer the traditional icy blues and whites or want to incorporate reds and greens for a more festive feel, the choice is yours.
If you’re crafting with young children, they might enjoy a rainbow of hues, adding a pop of color to brighten up the shorter days.
For those who adore a minimalist aesthetic, sticking to white or neutral-toned cardboard paired with silver or gold accents can create an elegant display.
Sometimes, I like to use metallic or glitter paper as a base to give my snowflakes an extra sparkle.
The options are limitless, and each alteration makes your snowflake craft uniquely yours.
Aside from the cardboard color, you can also vary the Q-tips’ shades. Many craft stores offer cotton swabs in different colors, which can be an excellent way to add contrast or complement the cardboard’s tone.
Another idea is to dip the Q-tips in paint or glitter, ensuring they stand out against the backdrop.
If you’re feeling particularly creative, play around with different textures, such as incorporating yarn, ribbon, or fabric, to add depth to your snowflake designs.

Supplies You Will Need
- Cotton swabs: Gather plenty of cotton buds for creating the intricate snowflake patterns.
- Cardboard: You’ll need cardboard pieces to serve as the sturdy base for your snowflake creation. Cut them into circles beforehand.
- White paint: Use this to give your cardboard a snowy look or choose colors that fit your winter theme.
- Colored paper: Opt for blue paper to enhance the wintry feel of the snowflakes, though you’re free to pick any color you like.
- Paintbrushes: Have various sizes on hand to paint your cardboard bases with precision.
- Scissors: You’ll need sharp scissors for cutting the cotton swabs to the desired lengths.
- Hot glue gun: A crucial tool for adhering the cotton swab pieces securely to the cardboard. (Elmer’s glue works just as well, especially with younger kids!).
- White pom poms: These will add a fluffy, 3D effect to the center of your snowflakes.
- Wax paper: Place your craft in progress on a sheet of wax paper to prevent the glued parts from sticking to the surface.
- Hole punch: This is for making a small hole at the top of your snowflake ornament for hanging.
- String or ribbon: You’ll use this for hanging your finished snowflake decorations.
Step-by-Step Creation Guide
I’m excited to guide you through crafting your very own Q-tip snowflakes.
With a few basic supplies and some creative energy, you’ll be on your way to creating these intricate designs in no time.
Keep this page handy as I take you through each step, ensuring your crafting adventure is fun and successful.
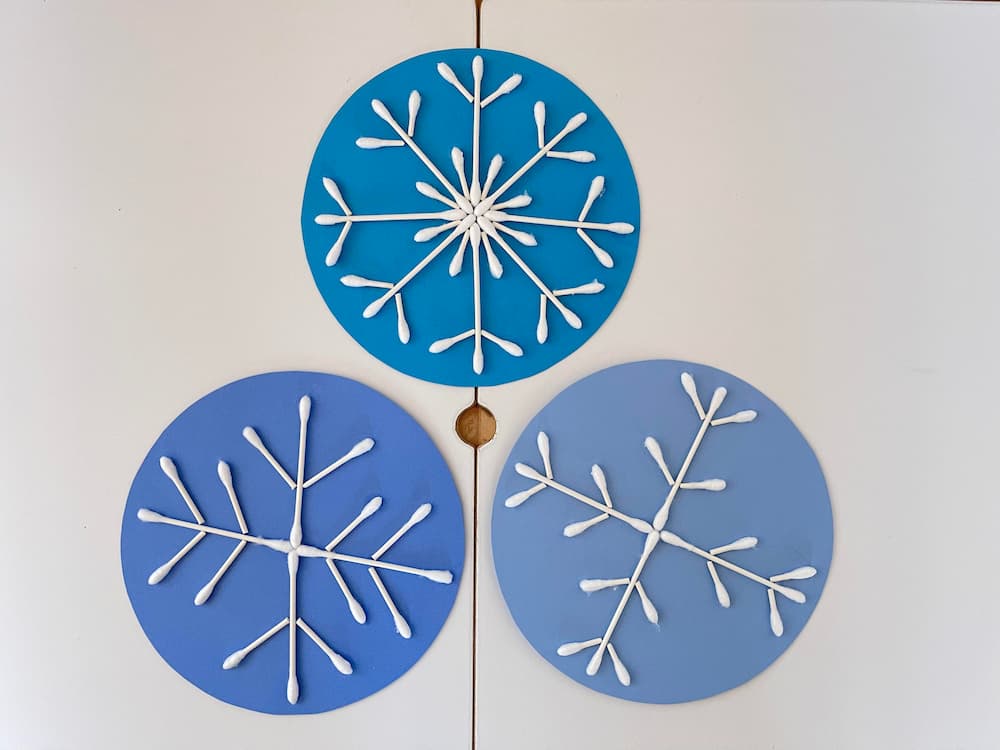
Cutting and Painting Cardboard Circles (option 1)
- Select the proper cardboard size: Begin by choosing a sturdy, yet easy-to-cut piece of cardboard. I find that a size of at least 6 inches in diameter works well for visibility and handling ease, but you can adjust the dimensions based on your snowflake design needs. Making different sizes is a fun way to create a variety.
- Cut the cardboard into circles: Use a compass or trace around a round object, such as a bowl or a lid, to create a perfect circle on the cardboard. Then, take scissors—or a craft knife for precision—and cut out the circle. If I’m doing this step with kids, I prefer safety scissors.
- Paint the circles for a wintery effect: I recommend using blue construction paper glued to the cardboard for a quick and colorful background. However, if you prefer to paint, select an acrylic or washable paint in a cool shade of blue. Lay the cardboard circle on a piece of wax paper to prevent sticking, and apply an even coat of paint. Allow it to dry completely before proceeding to the next step.
Cutting Cardstock (option 2)
- Select the cardstock: Begin by choosing a variety of cardstock colors you want to use as the background to your snowflake design.
- Cut the cardstock into circles: Use a compass or trace around a round object, such as a bowl or a lid, to create a perfect circle. Then, take scissors and cut our your circle.
Cutting Q-Tips to Size
- Choose Your Q-tips: Start with clean cotton swabs. For a variety of snowflake designs, gather a good amount.
- Prepare the Cutting Surface: Lay down a piece of wax paper to protect your table and to make clean-up easier after cutting the q-tips.
- Determine Lengths: Decide on the lengths you need for your snowflake. Remember, the beauty of a snowflake lies in its symmetrical yet unique patterns. You might want full-length, half-length, or even smaller pieces to create intricate designs.
- Handle with Care: Hold the cotton swab close to where you will cut to prevent the q-tip from bending. This control ensures a clean cut.
- Cut the Q-tips: Snip the cotton swabs at the desired lengths using sharp scissors. Cutting multiple pieces to the same length at once can save time and help maintain uniformity.
- Create Variety: Mix up the lengths for an assortment of shapes. Short pieces work well for detailed ends, while longer ones can form the structure of your snowflake’s arms.
- Organize Your Pieces: Separate your cut pieces by size. This step will make the assembly of your snowflake more manageable and more enjoyable.
- Practice Fine Motor Skills: As you handle and cut small q-tip sections, you’re honing fine motor skills, which are especially beneficial for younger crafters.
Keep in mind that precision is key. Neatly cut q-tips contribute to the overall elegance of your snowflake design. Get creative with the patterns you form, combining various lengths to mirror the delicate intricacies of real snowflakes.
Assembling Your Snowflake
- Place a White Pom Pom: Begin by applying a dab of hot glue to the center of your painted cardboard circle. Press a white pom pom firmly into the glue, holding it for a few seconds to ensure a secure bond.
- Arrange Q-Tip Pieces: While the pom pom sets, sort your cut q-tips by size. This will speed up the process as you design your snowflake.
- Design the Snowflake Arms: Dab a small amount of glue on one end of a q-tip piece, then adhere it to the cardboard, radiating outwards from the pom pom. Continue gluing q-tip pieces, playing with different lengths to mimic the intricate patterns of a snowflake.
- Form Symmetry: For the most visually pleasing snowflake, work in opposite pairs. After attaching one q-tip, glue another directly across from it, continuing this pattern until you have an even, symmetrical shape.
- Fill in the Design: Once the basic snowflake shape is formed, begin filling in with smaller pieces of q-tips. Apply glue to the tips and insert these pieces in between the longer ones to create density and complexity in your snowflake design.
- Let it Dry: Once all pieces are in place, allow your snowflake to dry completely. This ensures that none of the pieces shift or fall off when you move to the next step.
Finishing Touches
- Add Extra Decorations: If you feel like your snowflake needs a bit more sparkle, this is the moment to add those small touches. Scatter some glitter or attach sequins to the q-tip ends for that extra shimmer.
- Prepare for Display: Using a standard hole punch, make a hole at the top of your snowflake. Select a string or ribbon that complements your design to thread through the hole.
- Secure the Hanging String: Tie a knot at the end of the string to ensure your snowflake hangs securely. You can adjust the length based on where you plan to display your craft.
- Consider Using a Paper Plate: For a sturdier base, you can start with a paper plate. Paint it to match your design, and then proceed just like with the cardboard.
- Incorporate Pipe Cleaners: For a 3D effect or to add more intricacy to your craft, twist pipe cleaners into spirals or other shapes and attach these to your snowflake using a hot glue gun.
Wrap-Up: Your Winter Wonderland Awaits
Embarking on the creation of Q-tip snowflakes opens the door to a magical winter wonderland right within your own home. Not only do you get to immerse yourself in an enjoyable craft, it’s a chance to craft memories alongside beautiful decorations.
Picture your living space twinkling with the unique charm of snowflakes, each one a reflection of your creativity and craftiness.
These delicate creations are more than mere embellishments; they can transform your environment into a serene winter scene, evoking the tranquil peace of a snowy day.
Imagine your Christmas tree adorned with handmade snowflakes, or your windows graced by these splendid frosty patterns.
I encourage you to dive into this simple craft, be it for sprucing up your festive decor, engaging in a fun project with loved ones, or simply to revel in the cheer of the season.
This craft isn’t just about the snowflakes—it’s about the joy and warmth they bring to every corner they grace.
RELATED POSTS
Krissy lives in California with her family of three that make up “The Hadicks.” With a passion for research and helping others, The Hadicks was developed as a resource for other parents and parents-to-be!